

Pawfessor Jakey, Blogville's Director of Artistic Services, here to teach you a quick and easy way to make a Valentine on the computer!!
This month we are going to use Pic Monkey in order to create our masterpiece!! There are no programs to download and they have lots of different ways to "dress up" for FREE!!!
First, we will need a volunteer from the audience.....
you (or your staff) can use any type of photo
(taken with camera, a phone or a tablet) in PicMonkey.
you (or your staff) can use any type of photo
(taken with camera, a phone or a tablet) in PicMonkey.

Thanks for volunteering, Arty!!
Now, let's make Mama a Valentine!
Now, let's make Mama a Valentine!
First thing we do is go to PicMonkey


as you can see you can get your
picture from a few different places. Arty's picture is on Mama's computer, so that is where we clicked!

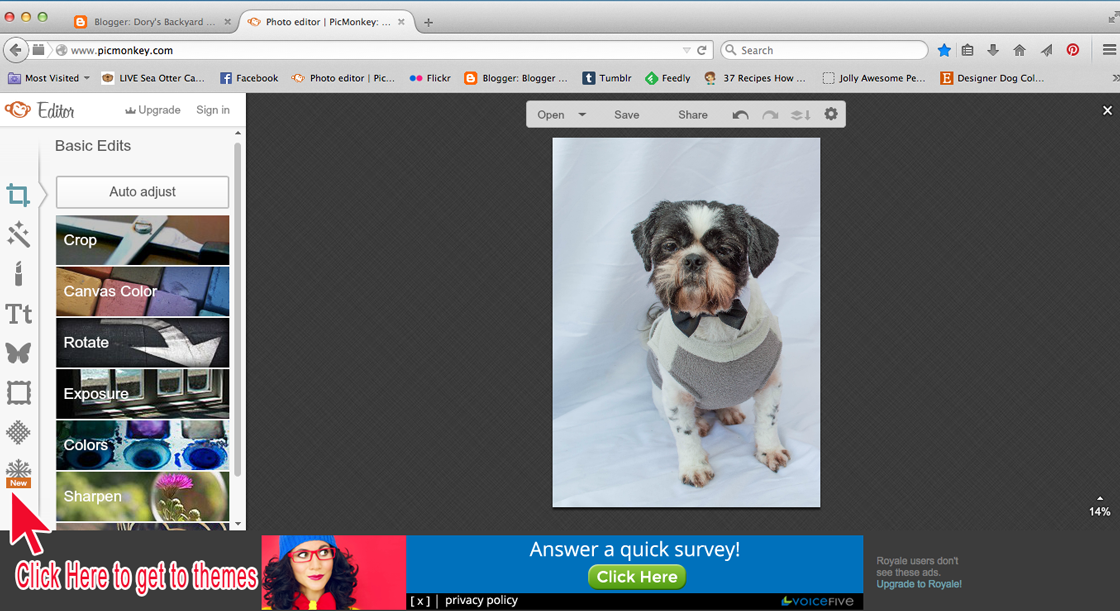
Clicking this will take us to where we can see all of the themes.


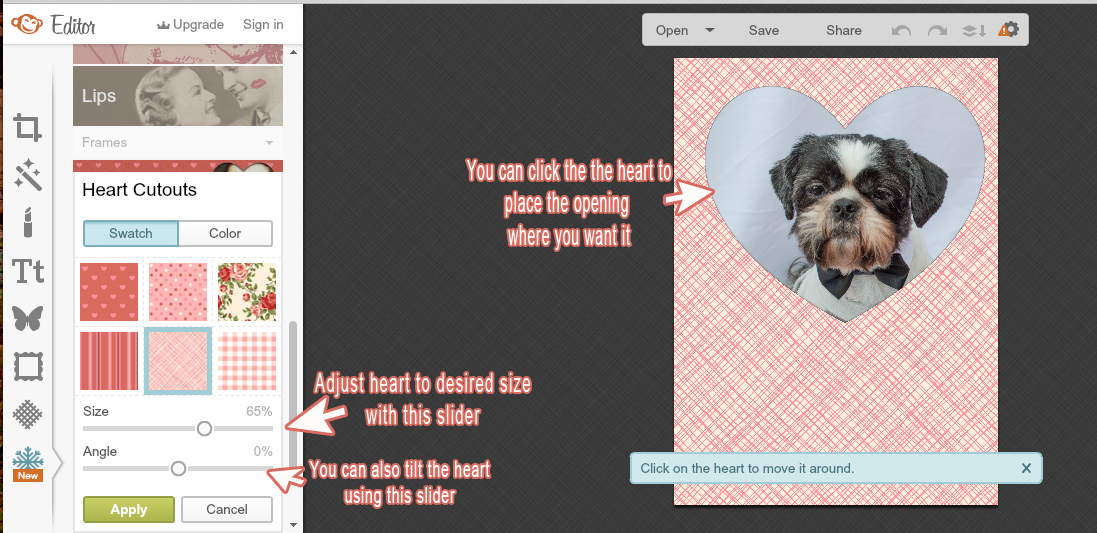


Click on the "Sweet Nothings" tab on the left.


fun things to choose from, we chose a couple of "doodly hearts.

Click the heart(s) you would like to use. You can move them around by clicking the heart and dragging it to where you would like to place it. Change the size by dragging the corners and even change the color of the heart!
 Now that you have things all pretty, let's save it!
Click on "Save" up at the top of the page.
 On the left you will see a few different things to choose. Mama and I are telling you what we use.
Depending on your computer, and what you are going to use the picture for, you may want to use different settings. Feel free to ask us in the comments or email us with any questions.
Name your file something that you will remember, we used Arty-Valentine. We saved it to medium format (this works for just about everything). The dimensions will automatically fill in (Mama is picky so she picks the size herself).
Next Click Save to my Computer and we are almost done!
 Make sure you save the final product somewhere you remember it. I can't tell you how many times Mama has saved something and then forgot where she saved it!! In this case, Mama saved it to her Desktop.
 And TA-DA
You can add the dressed up photo to your blog just like you add a regular picture!!!
Questions, concerns....???
Let us know via email or comments and we will do our best to explain it in upcoming posts or get back to you with the answer!!
This is Jakey, Director of Artistic Services, saying....
Happy Creating and we will see you next month with our next photo class!!!
We will be saving all our photo classes to our "Photo Class" page for easy reference
Please note that we are not advertising, and are in no way affiliated with PicMonkey. It is a photo editing site that we enjoy using only. All our opinions and directions are our own.
Click on "Save" up at the top of the page.
Depending on your computer, and what you are going to use the picture for, you may want to use different settings. Feel free to ask us in the comments or email us with any questions.
Name your file something that you will remember, we used Arty-Valentine. We saved it to medium format (this works for just about everything). The dimensions will automatically fill in (Mama is picky so she picks the size herself).
Next Click Save to my Computer and we are almost done!
You can add the dressed up photo to your blog just like you add a regular picture!!!
Questions, concerns....???
Let us know via email or comments and we will do our best to explain it in upcoming posts or get back to you with the answer!!
This is Jakey, Director of Artistic Services, saying....
Happy Creating and we will see you next month with our next photo class!!!
We will be saving all our photo classes to our "Photo Class" page for easy reference
Please note that we are not advertising, and are in no way affiliated with PicMonkey. It is a photo editing site that we enjoy using only. All our opinions and directions are our own.
Cute Valentine!
ReplyDeleteDory this is just pawfect, if you knew just how computer illiterate my Mum is you'd know just how helpful this is!!!!
ReplyDeleteShe'd be lost without Aunty Freya's Mum doing all my pictures!
Loves and licky kisses
Princess Leah xxx
Great tutorial and we sure will give it a go. Have a tremendous Thursday.
ReplyDeleteBest wishes Molly
Very nice tutorial on Valentines and a super handsome subject too!
ReplyDeleteSuper adorable. Thanks for sharing!
ReplyDeleteJakey you did such a super job of the tutorial.. i will be sending a few over to view since i am a PicMonkey addict and get lots of questions. this is grrrreat.
ReplyDeleteApaws Professor Jakey! That was a great lesson... even my momma said she got it... at least she said so...
ReplyDeleteEasy Rider
Excellent tutorial!!! I love picmonkey and use it all the time!
ReplyDeleteOz
Great tutorial, Arty!! Thanks!
ReplyDelete-Otto
Wow! That's pawesome, and so easy to use!
ReplyDeleteVery nice.
ReplyDeleteThis comment has been removed by the author.
ReplyDeleteOOOO JAKEY FORGIVE MOM FOR THE
ReplyDeleteNAME FAUX PAS....IT IS JAKEY THE AR-TIST NOT ARTY. MOM IS BAD ABOUT SPEED READING
HUGS MADI YOUR BFFF
MOL MOL ARTY WAS THE VOLUNTEER!!
ReplyDeleteHUGS MADI YOUR BFFF
You sure make that look easy. Thanks
ReplyDeleteLily & Edward
This is a pawsome tutorial!
ReplyDeleteExcellent lesson and we love that you have a place set up for folks to visit to learn!
ReplyDeleteYour Pals,
Murphy & Stanley
EXCELLENT ♥ LESSON ♥ esp. fur this time of Year ♥ ... just sayin.
ReplyDeleteWe may give this one a Whirl...
That looks gorgeous, we love it!
ReplyDeleteThank you for showing us how to do it, your instructions are very clear and even the stupidest person can understand them - right Mum?
Dip and Elliot x
what a wonderful class! Thank you, we have never tried picmonkey before. I think we will have to check it out!
ReplyDeletehugs
Mr Bailey, Hazel & Mabel
Great tutorial.
ReplyDeletehow adorable
ReplyDeleteretro rover
We went to check to make sure picmonkey doesn't make any changed photos public. Their policy says they don't, so we just might try it when we get a chance.
ReplyDeleteThat is such a cute and useful tutorial! Thank you for sharing that adorable Valentine!
ReplyDeleteThat was a great tutorial. Thanks for doing it, and for saving them all in one place so they're easy to find!!! Well done, Artie!
ReplyDeleteVery cute!
ReplyDelete