
Jakey, Director of Blogville's Department of Artistic Services here, with the next installment of our PiZap tutorial!
Before we start, I want to thank everyone for all their comments on last week's tutorial!! Mama and I just love seeing all of your creations and are having so much fun helping Blogville Citizens explore their artistic sides!!
Today we are going to explore the editing part of PiZap!!

When we last left Bilbo, he was standing next to the ducks in the mud! If you missed our tutorial on how to cut Bilbo out of the living room and put him in the mud you can click HERE to go to last week's tutorial :-).
This week we are going to splash Bilbo with some mud, put some (much needed) glasses on him and give him some words!

Let's get started by going back to PiZap.com and press that big green "START" button.

This time, we are going to click "Edit"
(since we are "editing" the picture of Bilbo)

Our pictures are on our computer, so we clicked
computer.

We opened the picture of Bilbo in the mud that we saved last week.

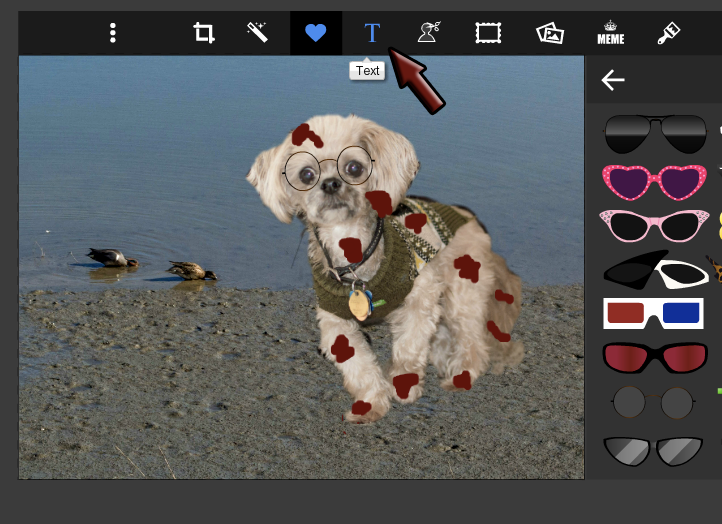
In order to get him a bit "muddy" we are going to splash him with a bit of red paint.
We picked the "paint" button.

Then we made sure the paintbrush button was chosen and changed the color by clicking the square by the brown arrow.

Once we found the right color, we "painted" Bilbo with
"mud" (and boy was that fun!!)!

Now, since Bilbo has been complaining about not being able to see well lately, we fitted him with some glasses! We clicked on the "Stickers" icon (it's the one that looks like a heart).
We found the "glasses" category on the right, about halfway down.

Since Bilbo likes "Professor" type accessories, we chose some wire rimmed glasses. We clicked on them, moved the over Bilbo's eyes and sized them to his face by clicking and dragging the gray dots.
He kinda looks like Harry Potter, doesn't he??
BOL!
Now let's give Bilbo some words!!
We do this by clicking the Text button (the letter T at the top)

Next, we clicked a text bubble on the side. We chose a "thought bubble".
After that, we clicked in the middle of the text bubble to type the text, easy peasy!

Finally we changed the size of the bubble and moved it out of Bilbo's face.
We clicked outside the actual text box. See the dots all around the text bubble? We clicked and dragged these dots to make our bubble just a bit bigger.
We clicked outside the actual text bubble (when the dots are showing) and dragged the bubble out of Bilbo's face and to the side.
Once we got the text box where we wanted it and the size we wanted we clicked on the check.

Now all that is left is to make sure it is saved where Mama can remember it and.....

Tada!!! Bilbo has mud on him.... and he won't even have to take a bath to get clean!!
Stay tuned next week when we play with the collage part of PiZap!!
We will be saving all our photo classes to our "Artistic Tutorials" page for easy reference
Please
note that we are not advertising, and are in no way affiliated with
PiZap. It is a photo editing site that we enjoy using only. All our
opinions and directions are our own.
Another fangtastic tutorial! We are just loving Pizap, thank you Jakey.
ReplyDeleteWally & Sammy
Way cool and thanks for showing us. Have a tremendous Thursday.
ReplyDeleteBest wishes Molly
Oh I have gotta get Mum to do the glasses thingy. I finks glasses make me look very clevers and my Chester is such a knowledgeable clevers pup I don't want him to find out I'm a bimbo Princess!
ReplyDeleteLoves and licky kisses
Princess Leah xxx
We learn so much from you, Jakey. Thank you!
ReplyDeleteLove ya lots♥
Mitch and Molly
LOL! Funny pic! Love the tutorials. Mom sometimes needs to tweak a photo, but all the programs are so different and she gets frustrated trying to figure them out so these help.
ReplyDeleteThank you so much Professor Jakey! We love your lessons, you are a much better teacher than my dad, who gives us names after a minute...
ReplyDeleteWe will learn with you now and my dad is fired, ha!
easy rider
Jakey you are one great instructor...Mom aka the old gray mare is learning something...and that is a good thing
ReplyDeleteHugs madi your bfff
Jakey, you make it look so easy. Hopefully Lady will have time this weekend to try something out!
ReplyDeleteANOTHER Excellent Superb Class. We loved it. You are a fabulous teacher. WAY TO GO....
ReplyDeleteThanks so much, Jakey! You are a great teacher!!
ReplyDeleteHari OM
ReplyDeleteAPPLAWS APPLAWS... you are doing such a wonderful job Jakey!!! Hugs and wags, YAM-aunty xxx
Thank you for all those expert tips
ReplyDeleteSnorts,
Lily & Edward
we love pizap...mom is getting rather addicted to it...stella rose
ReplyDeletewhat a fun way to get muddy, so easy for mom to bathe you off... thanks for the art lesson..
ReplyDeleteBravo Professor! Another excellent lesson! We are also hearing great things about your classes!
ReplyDeleteYour Pals,
Murphy & Stanley
Wow, that really is incredible. Love the mud and caption. Mum will have to get over her technophobia and do some cool pictures of us.
ReplyDeleteDip and Elliot x
We are liking PIzap more and more each time you give us a lesson. Thanks for sharing your great ideas.
ReplyDeleteWoos - Phantom, Ciara, and Lightning
You really are great with these tutorials Jakey! Now we just have to get Mom some time to check PiZap out - it looks real easy
ReplyDeletehugs
Mr Bailey, Hazel & Mabel
What a fun site to do it yourself awesome pictures!! Thanks!
ReplyDeleteWhat a great tutorial. At least Jakey doesn't need a bath from getting mud on him this time.
ReplyDeleteAwesome. You look so cool Jakey, and your instructions are great. It's so wonderful that you are archiving all these lessons so we can go back and re-read them when we need them!
ReplyDeleteThat was a GREAT tutorial! And my, don't you look HANDSOME and smart with your glasses on!
ReplyDeleteCammie!